Vehicle modifications
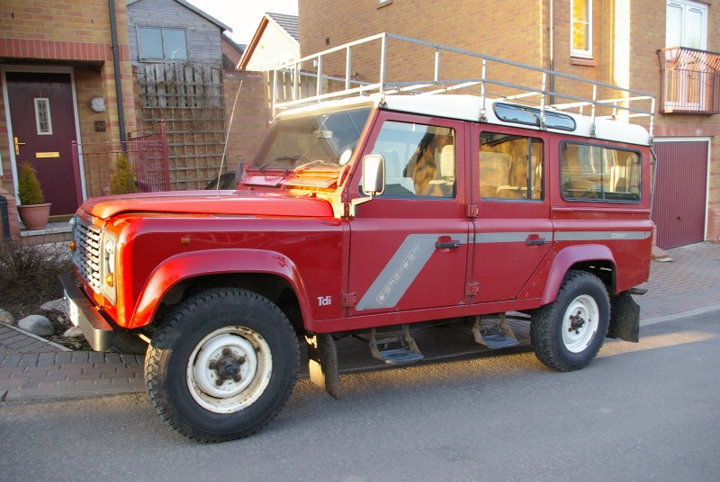
From this...
|
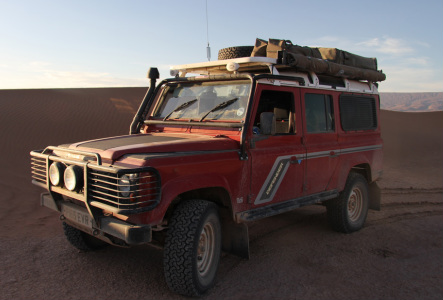
...to this
|
The Defender 110 County Station Wagon
In our four years of ownership of the Scarlet 4x4 we have changed her from a bog standard, one previous lady owner run-a-bout, to a vehicle built and kitted out for overland adventure.....
Being newbies to Land Rovers and offroading - we thought we could use a little help in realising these changes.
We scoured Land Rover magazines, wandered around Billing and Peterborough LRO shows and went to visit three of the larger, well known overland outfitters.
We chose Nene Overland, who had some excellent ideas and advice on our modifications, and completed the initial round of modifications to our complete satisfaction.
Unfortunately, after that, further execution of our requirements from Nene's workshop side was really very poor.
Nene were also wedded to Britpart spares - and just about every Britpart component on our vehicle has failed.
To be fair to Nene, they never quibbled and took (towed) the vehicle back on several occasions to fix multiple errors and installation damage, but this was always two steps forward, one step back. We rather lost faith in the end and went elsewhere and paid out again for much of the equipment to be re-fitted properly or repaired.
Since then we have had further failures of some of the Nene fitted parts, and again to be fair, Nene have been very good at sending us replacements with zero quibble or hassle.
In our experience, it is the smaller garages, owned or staffed by Land Rover and over-landing enthusiasts, like Nick Paxton and Matt Savage who provide the best advice and service. More detail in our useful links page.
Why did we take such an old vehicle?
We took the conscious decision to buy a 300 Tdi engined vehicle. This is the last diesel engine from Land Rover that had no electronic engine management system (also called an ECU), but had the advantages of 1990's technology and "reliability" over vehicles from earlier decades. We have heard these referred to as over landing pinnacle vehicles.
The perceived wisdom is that a non-electronic 300 Tdi engine can be fixed by pretty much any mechanic, anywhere, without the need for diagnostic and engine mapping equipment. These particular engines were built between 1994 and 1998.
This is not an important consideration if you stick to Europe, North America, "developed" Asia or Australia for your adventures, but if you're planning on trips beyond, the advantages of electronic engine management come with associated risk if you experience an ECU related breakdown.
So, if you want a reliable, fixable engine like the Tdi or Toyotas equivalent, the vehicle it's bolted too will be 16 - 20 years old by now. Therefore it's gonna need some significant investment in time and money to get it up to the required standard for the rigours of over landing....
As the years pass this will get harder, requiring more work and expense to get a pinnacle vehicle on the road...wish we'd done this ten years ago!
We met plenty of people on-the-road with later engines and newer vehicles, some with their own diagnostic equipment and spare ECU's on board. Some had horror stories, some didn't. There's no such thing as the perfect vehicle, engine or set up, its all about compromise and your attitude to risk, within your timescale and budget.
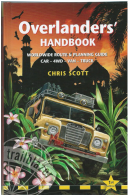
These books, the web and talking to other over landers helped us make our own decisions, and cover the above argument in more detail and clarity than our own bumbling summary:
The perceived wisdom is that a non-electronic 300 Tdi engine can be fixed by pretty much any mechanic, anywhere, without the need for diagnostic and engine mapping equipment. These particular engines were built between 1994 and 1998.
This is not an important consideration if you stick to Europe, North America, "developed" Asia or Australia for your adventures, but if you're planning on trips beyond, the advantages of electronic engine management come with associated risk if you experience an ECU related breakdown.
So, if you want a reliable, fixable engine like the Tdi or Toyotas equivalent, the vehicle it's bolted too will be 16 - 20 years old by now. Therefore it's gonna need some significant investment in time and money to get it up to the required standard for the rigours of over landing....
As the years pass this will get harder, requiring more work and expense to get a pinnacle vehicle on the road...wish we'd done this ten years ago!
We met plenty of people on-the-road with later engines and newer vehicles, some with their own diagnostic equipment and spare ECU's on board. Some had horror stories, some didn't. There's no such thing as the perfect vehicle, engine or set up, its all about compromise and your attitude to risk, within your timescale and budget.
These books, the web and talking to other over landers helped us make our own decisions, and cover the above argument in more detail and clarity than our own bumbling summary:
|
|
|
|
|
Modification timescale and budget
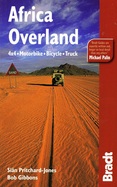
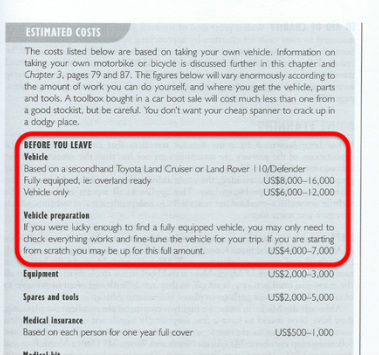
The first (of many) over landing tomes we purchased was Bradt's "Africa Overland".
Page 5 (of the 2009 edition) has a section on "Estimated Costs":
Page 5 (of the 2009 edition) has a section on "Estimated Costs":
|
We read this in 2010, shortly after spending just over £7000 on Scarlet 4x4, so at first glance the figures seemed about right. Based on the book then, another £4000 on modifications, another £6000 for kit (top end figures), and we'll have a vehicle ready for the off? I dare not start laughing at this point, as my laughter is liable to become hysterical sobbing. We spent many times that amount.... The figures for equipment were short of the mark too, but the spares figure was about right? |
We don't even know how much we spent in total (all the receipts are in a box, the lid of which is marked "Pandora").
We took the decision to stop counting once the figures got eye watering, and ditched the budget spreadsheet, otherwise we'd have simply stopped the project and taken up train spotting, or heavy drinking, or both...
Practically this meant our preparation was spread over several years. Work was done in phases, as we could afford it.
We spared no expense on the important stuff and purchased quality over landing equipment, equipment that would last, often from Australia or South Africa. Buying this stuff in the UK can be very expensive. Over landing equipment seems to command quite a premium.
It CAN be done cheaper, one book suggested the back of take-away restaurants as a source of potential water containers (used plastic cooking oil bottles, rinsed out) and cardboard banana boxes as robust, disposable storage boxes.
All this is OK in the short term (clear plastic water containers will eventually grow algae, cardboard would have disintegrated in the damp), but we made the choice that as we wanted to do multiple trips, and rather felt our student "make do and mend" days were behind us we wanted decent, dependable gear.
With hindsight, we would not actually change much of what we purchased, or the way we purchased it.
Where our lives, literally, depended on something, we bought what we thought was the best, and we bought spares or a back up system. We bought some bling too, and we bought some expensive kit that turned put to be crap (details below).
But in the grand scheme of things the crap stuff did not constitute that much of the budget.
We were not irresponsible with our cash, we could afford the expense, but we're not shy of getting decent kit second hand from eBay or elsewhere (this saved us over £2000 on tent, roof rack and awning alone).
Caravanning and motor-home shops sell robust equipment without the silly price tags, and the bicycle panniers we hung internally on the cargo guard were from our local Aldi (and are still going strong...)
We also feel that had we researched more thoroughly up front, we'd never have started. We'd be sat here now, significantly richer in the wallet, with a few more run-of-the-mill package tours under our belts, but missing out on the amazing experiences we have had...
To put our expense into some perspective:
- We read a review in a Land Rover magazine of a chap who'd done the same as us and spent about £30k on modifications. That now seems entirely reasonable.
- Some of the second hand Land Rovers for sale at Nene Overland had cost £50k-£75k to initially prepare.
- We had the option to buy an amazing fully kitted out second hand Land Rover 110, that had already crossed Australia and Africa - for £24k. It cost £50k originally. We'd still have spent a further significant sum on the major service it would have needed and fitting the kit that it didn't have that we still wanted?
- We met a fantastic couple from the Netherlands who had bought a converted Daihatsu Galloper 4x4 with tent and gear for €3,500. It just about got them to Mongolia. It (literally) nearly killed them on the way and it was dying before our eyes, but at that money it's disposable, risky but do-able, and great fun?
- A Swiss couple we met in Tajikistan and Kyrgyzstan had a friend who visited an over landing sales convention in Germany with £50k in his pocket to convert a vehicle, and was laughed out of the room...
- We have met uber-overlanders in converted trucks that have spent between £150k and £300k on their (incredible) vehicles!
- We know a UK couple with a 1995 Defender 110 who spent £9k on servicing and repairs alone to get their vehicle ready.
Over landing can be cheaper, much cheaper than above, but that cheapness comes at another cost in terms of higher risk of not finishing your trip with you and the vehicle in one piece?
In terms of timescales, we embarked on the project without a departure date in mind.
This probably dragged things out a little, but also saved us some money in that we did a lot of work ourselves, and had the time to scour eBay for bargains.
It was 2.5 years between purchase and our first major trip.
If we'd have been in a rush we'd have still allowed a year minimum for modifications and the all-important trial runs.
Brief Modifications List
Additional Security:
Modifications to original spec:
Storage and camping gear
The omissions (the bits people always ask us why we have not got)
Now, with hindsight and two big trips under our belt, we're still convinced a winch is a waste of time and money, but we might be persuaded to change the internal configuration for that fridge in future?!
- A range of after market security devices - providing 5 levels of additional security
- Progressive window tints (blackout in rear cargo area)
- Steel window grills to rear cargo area and rear safari door
- Cargo barrier grill dividing cargo area from front 2 seat rows
- Additional Foley stainless steel hasps and padlocks to all 5 doors
- 2 x fire extinguishers and fire blanket
- Stereo with removable facia
- Locking wheel nuts (for UK use, we will use standard nuts while travelling)
Modifications to original spec:
- Chassis waxoil
- Cab roll cage (A & B pillars only)
- Heavy duty suspension - fitted by Matt Savage – Old Man Emu (OME) shocks and springs
- Removal of engine exhaust gas recirculation (EGR) valve
- Uprated radiator and intercooler from Allisport (worth every penny)
- Exhaust catalytic box replaced with straight through pipe section
- Removal of factory fit tow pack to improve departure angle (tow bar and electrics)
- Heavy duty “Wolf” Steel Wheels and studs (Land Rover upgrade) with 265/75 BFG AT tyres
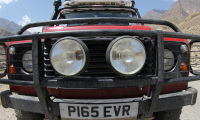
- Bull bar with front driving lamps (x2)
- HID headlamps
- Heavy duty clutch (Britpart first time - and when that failed - Valeo)
- Uprated 100A alternator (Britpart first time - and when that failed - back to standard Denso one)
- Bonnet and wing checker plate with marine grade non-slip rubber coating - custom made by Kev Mackman at Nene Overland (one of our best modifications - a fantastic product)
- Additional internal Exmoor Trim soundproofing (acoustic matting)
- Dynamat sound proofing to doors and floors
- Noisekiller sound proofing in bulkhead footwells and under the bonnet
- Ten of the original 12 seats removed
- Front centre seat replaced with Exmoor Trim key locking cubby box
- Mud stuff dashboard centre console with carling switches for additional lighting, air horn etc.
- Additional (useless) oil pressure and external temperature gauging
- Additional (useful) tachometer gauge installed in dash
- 2 x 12v fans fitted to internal cab roll cage (in lieu of air conditioning)
- Internal cab lighting cab replaced with high intensity Mud stuff LED fitments
- Split charge double Odyssey battery set up with (pain in the arse) National Luna battery management system (we are on our second display failure in two years)
- Battery kill switch, and socket for Viair compressor (subsequently removed)
- Cargo barrier grill separating cargo / load area - with multiple storage bags / panniers attached
- Driver and passenger seat re-foamed and re-upholstered in Exmoor Trim Outlast fabric with additional lumber supports
- Mantec swing away spare wheel carrier to rear door
- Additional fixed work (reversing) lamp to rear
- Additional high level brake and indicator lamps above rear door
- Original folding side steps and sills replaced with heavy duty sill protection (rock and tree sliders)
- Various body bolts and screws upgraded to stainless steel
- Various Mud stuff internal cargo netting & map pockets throughout
- Hi lift jack (a lethal bit of kit!) on floor mounted bespoke bracket behind drivers seats
- 2 x jate recovery rings on rear chassis
- Mantec raised air intake
- Wading kit - extended breathers, radiator wading blanket and removable wading plugs
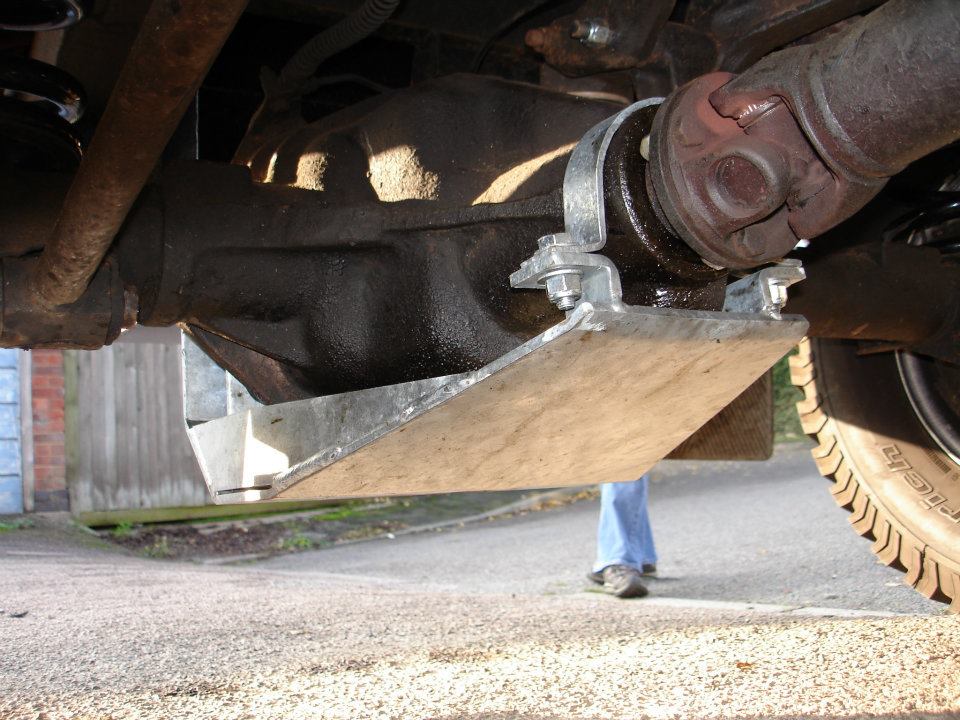
- Steering guard with 2 x front recovery eyes
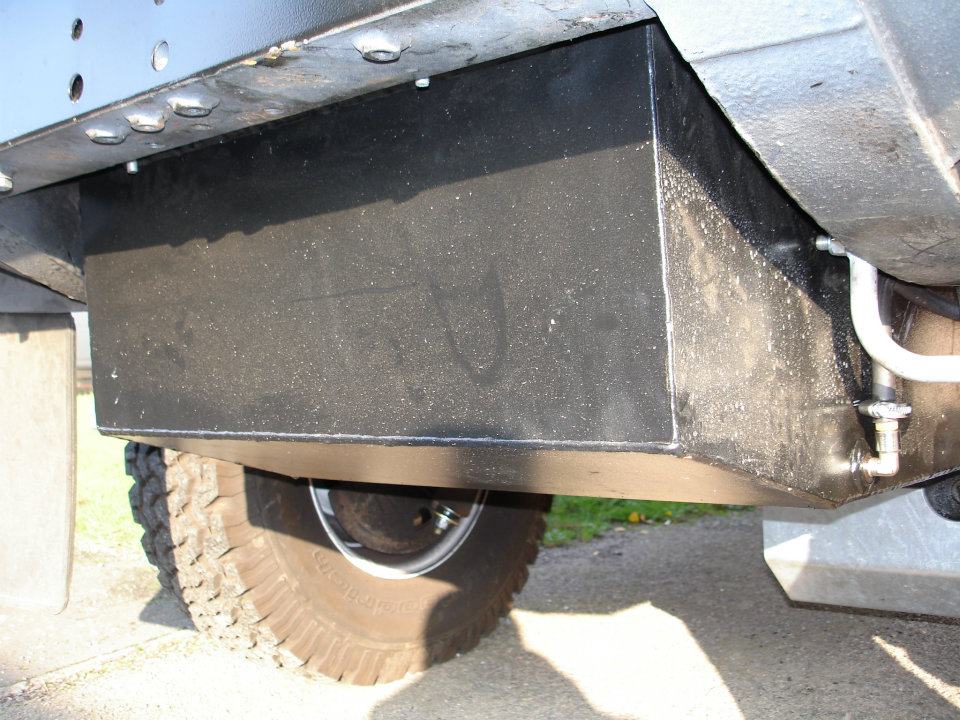
- Front and rear diff guards
- Long range stainless steel double skin fuel tank with additional rear wing mounted flow through tank (needed additional bespoke guards making - the fuel elbow was horribly vulnerable)
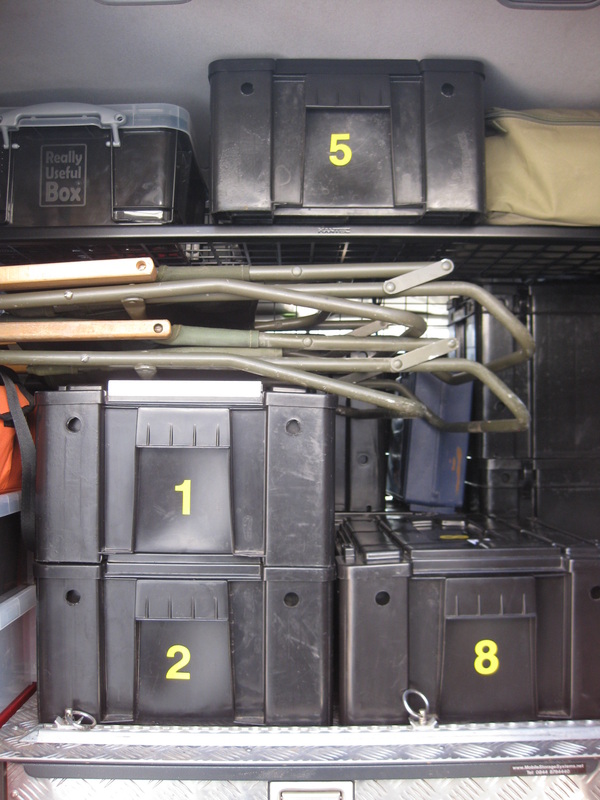
Storage and camping gear
- 3 x 2nd row seats removed and replaced with Nene custom rack for 2 x fuel and 4 x water jerry cans
- Plywood floor base bolted to vehicle with mounting and lashing points for 5 Flatdog "croc" boxes
- 2nd row also contains a 240v inverter, water pump and ceramic water filtration unit, tap, etc.
- Mobile Storage Systems long line heavy duty lockable storage drawer with load rails and lashing points
- Rear internal door trim removed and replaced with Mobile Storage Systems checker plate, cooker housing, gas cooker and gas bottle holder (a surprisingly terrible place to locate a cooker - blocks all rear access)
- Mantec Load Lugga shelf in rear roofline for extra storage (a really useful kit storage addition)
- 8 x wolf boxes and croc boxes for spares, cooking and camping storage
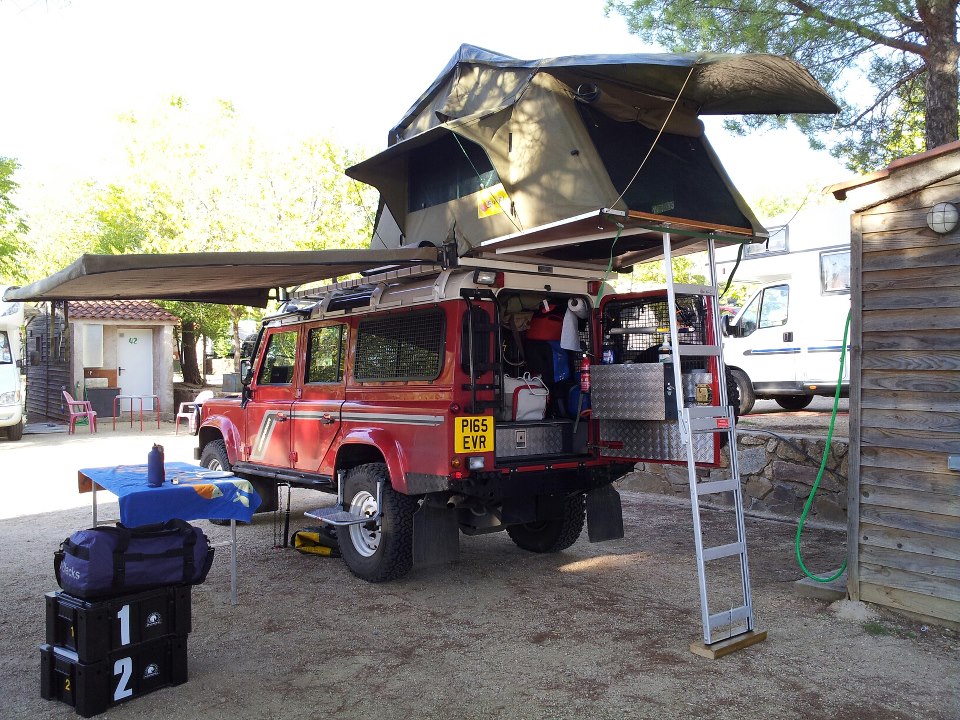
- Full length Hannibal roof rack with 2 x additional spot lights to front and slide in stainless steel kitchen table
- Roof mount spare wheel carrier
- Roof mount washing machine (barrel)
- Hannibal access ladder and step to rear
- Eezi Awn roof tent with wired in internal LED lighting, 12v socket, and a security switch to allow us to switch on the vehicle external lights at night
- Hannibal vehicle side awning
- Roof rack mounts for shovels
- Internal safe fitted
- Masai wheel step (just brilliant - it's a step, small table, bar, seat...)
- Door mounted bottle opener...
The omissions (the bits people always ask us why we have not got)
- Winch
- Fridge
Now, with hindsight and two big trips under our belt, we're still convinced a winch is a waste of time and money, but we might be persuaded to change the internal configuration for that fridge in future?!
The verdict (This section is proving very time consuming - please bear with us during development)
Time has definately told - some of the above modifications have been worth every penny, and some have been a complete waste of time and money. It's worth the comment too that some items have not proved their practical use as much as expected, but we still like them, if only for aesthetic reasons...
So, progressing through the list of modifications in a rough front to back vehicle order...
So, progressing through the list of modifications in a rough front to back vehicle order...
Bull bar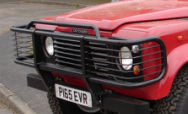
Cost£16 (2nd hand eBay)
£50 sand blast and powder coat ~£10 additional front fixing bolts that I drilled through bumper front |
+/-+ Headlamp protection
+ Rally light mount point + Reflects a little headlight back towards the driver (so we know if they're working - very useful with temperamental HID lights) + We painted diff location markings on the top rail, visible from the drivers seat, to help avoid rock damage + Looks good (we know this makes us fools, but its our car, so bugger off) + Offers protection from lighter impacts (like the back of a Mongol flatbed truck when Mark was not paying attention) - Weight - Increased pedestrian impact injury (a reason to remove it) - Mount points could be used for recovery eyes instead |
VerdictToo heavy to justify, it's staying on for now, but Scarlet does look crap without it...

|
100w Rally lightswired into hi-beam
Free (came off a neighbours Lotus Cortina)
|
+ Some additional hi-beam illumination (not much)
+ Improves our visibility to other road users (this WAS useful in flashing a warning) + Back-up when the temperamental HID lamps fail + They look great (in our opinion) - Restrict air flow to a struggling engine at altitude (we had to rotate 90deg to increase airflow) - Difficult to adjust beam vertically |
Not really necessary with HID lamps fitted. Smaller would be better for air flow at altitude.
Looks aside, they should come off, but wont in the UK. Another trip with altitude driving and they get replaced though... 
|
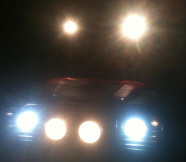
HID lamps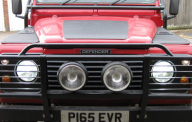
£TBA (Nene Overland)
|
+ Brilliant illumination!
+ Much better than the Land Rover standard bulbs (on a Tdi vintage) - Dazzle occasional UK drivers? Never, ever have this problem abroad though? - Would be better with electric level adjustment (as per Td5 models). Would solve the occasional flash from other drivers? - Nene never did manage to install them correctly. 20% of time only one lamp comes on, 2% of time no head lamps at all. Repeated on/off "power cycles" cures 90% of these issues... |
A "must have", make night driving so much easier.
Get them properly installed though! Check MOT requirements for HID bulbs! 
|
Roof mounted spotsOperating switch on dash centre console
£TBA (Nene Overland)
|
If you follow "the rules" and avoid night driving whilst over-landing - you will never need these.
I certainly never use them in the UK, even off road. There were two occasions off-road in Mongolia where we did not find a suitable campsite until after dark. The HIDS and rally lights were too diffuse to light up the detail of the track and pot holes. We put the two roof lights on, which just happened to be focussed onto each tyre track about 10m in front. Perfect! Made the drive safer and less stressful, therefore: + A god send when you need them - You shouldn't often need them - Expensive - Need wiring into a switch |
For two years I thought these were a waste of time, until I needed them and then very glad I had them!

|
Wading Blanket 1Exmoor Trim
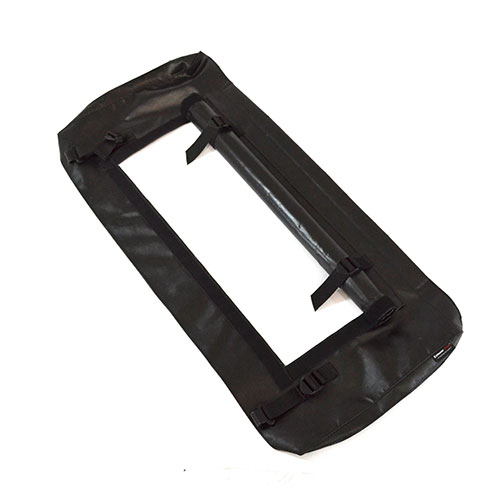
£50+!
|
- Poor design - even in the open position it obscures air flow.
- Terrible fit - looks like an oversized nappy hanging off the radiator grill. Not a secure, snug fit. - Expensive piece of poorly designed bin bag (IMO). |
Disappointing product from Exmoor, as some of their other stuff is great. Took it straight off the vehicle after initially fitting and have never used it since.
Complete waste of money. 
|
Wading Blanket 2Rough Guide
|
Td5 bumper end caps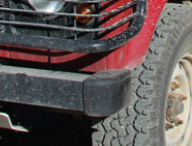
£20+ (eBay)
|
+ Some bumper protection
+ Fits the "ready for the apocalypse" styling + Very easy to fit, on our vehicle the mount holes were already there? ? Pedestrian protection (although that bull bar will get them first) - Bit pricey for what they are and do? |
Down to personal choice?
If on a budget I really wouldn't bother? 
|
Steering guard (1)(without recovery eyes and a bull bar fitted!)
|

|
Steering guard (2)(with recovery eyes!)
£70? (Craddocks)
|

|
Upgraded IntercoolerAllisport Intercooler and Radiator
£1000? (Allisport) + fitting labour (we used Matt Savage)
|
What a difference!

|
Brass bleed screwsRadiator and thermostat bleed screw caps in BRASS
£3 x 2 (eBay)
|
+ Simple replacements for the brittle original plastic ones (our old one snapped during replacement)
+ Easy to fit + Cheap! |
For what it costs and the potential disaster it avoids - why not?!

|
Silicon engine hosesAllisport
|
EGR valve blanking kitEGR valve blanking kit
|
|
Britpart 100w Alternator upgrade
|
+ Was recommended in many overland texts
- Britpart brand is unreliable - If you do need to change back in the field you'll need the Technical Manual as the wiring is slightly different and needs to be interpreted. - The upgrade did not have a heat shield and wiring was exposed close to the exhaust manifold (I had to protect with "Fire Braid" from eBay) |
Useful if you have a fridge or winch (which we don't)? Thought this was a good idea but we didn't really need it. Your set-up might though? Biggest issue was using Britpart spares which proved less than reliable. Now have a standard 75w Denso in place - no problems!

|
|
Under bonnet Noisekiller
£55 on-line (I think we paid a few quid less at one of the shows?)
|
|
Additional under bonnet 12v socket
|
|
Bonnet and wing chequer plate, with a marine grade deck rubber non-slip coating
|

|
|
Snow cowl!
|
+ Keeps out snow
+ Easy to fit + Looks awesome - I wanted one! - No snow yet?! - £20 spent that I could have put behind the bar down the Black Horse instead... |
Look I wanted one 'cos I thought it looked good, which makes me a plonker of the first order...

Self mockery aside, HAD it snowed hard in Siberia I think we'd have been glad of this...
|

|
|

|

|
Oil loss after following a gauge addition
|
Britpart alternator failure in Morocco
|
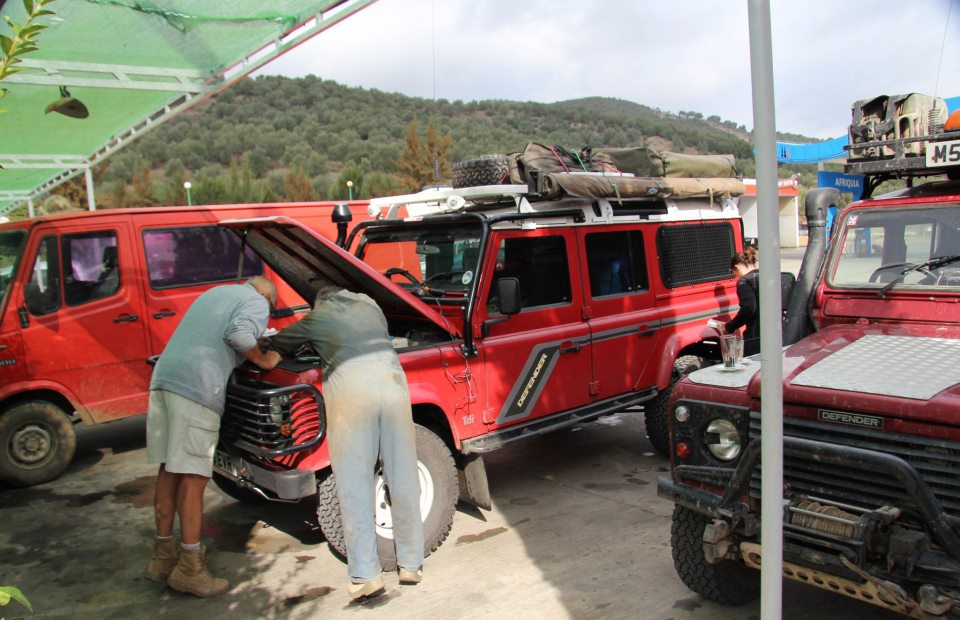
The truly fantastic Charles and Paul from Protrax / LROAC do some quick roadside repairs in Morocco
|
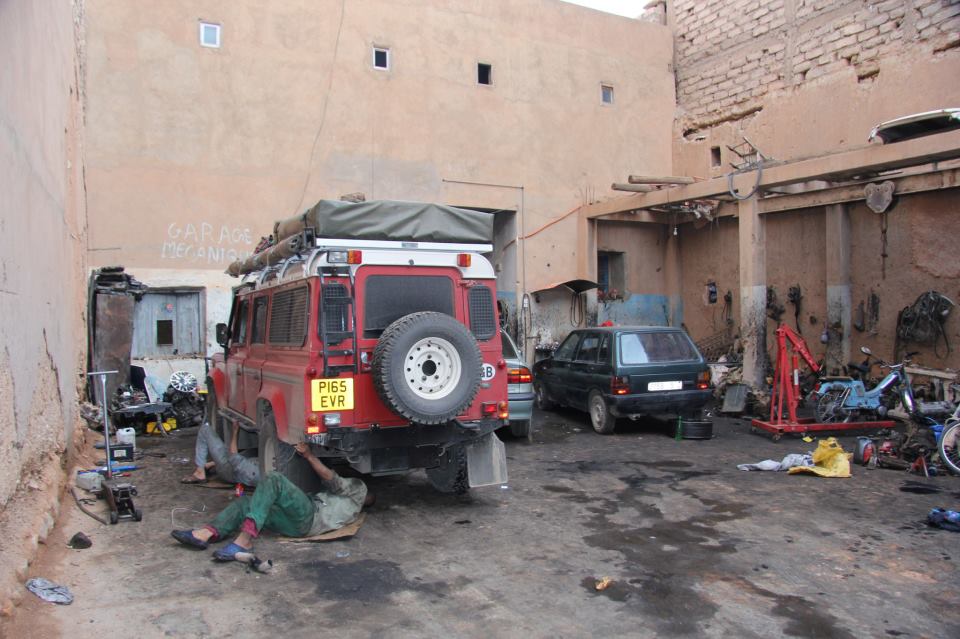
Moroccan "Garage Mecanique".
A solid welding job that lasted across the Atlas, Sahara and Europe
|
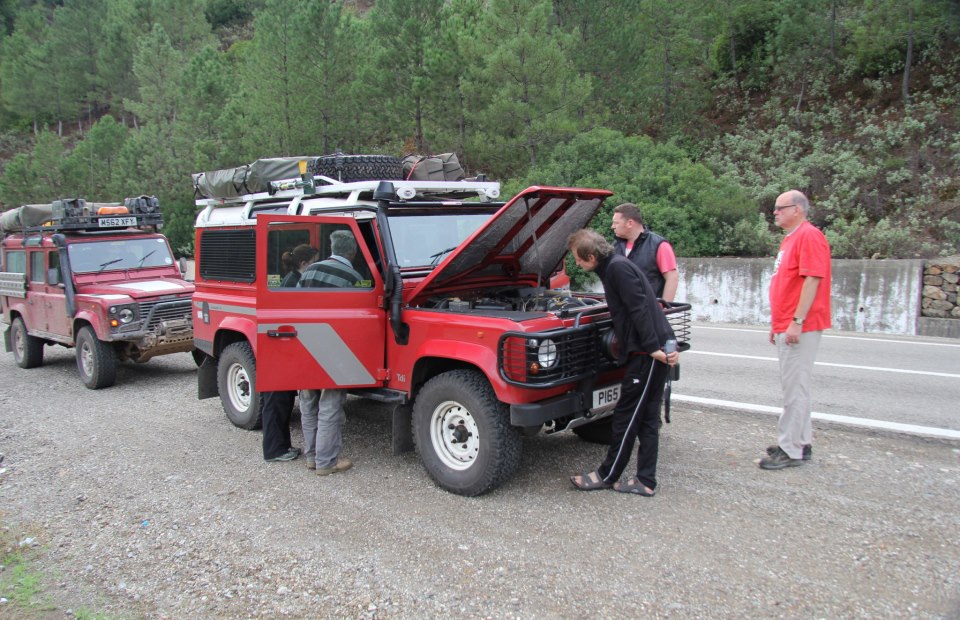
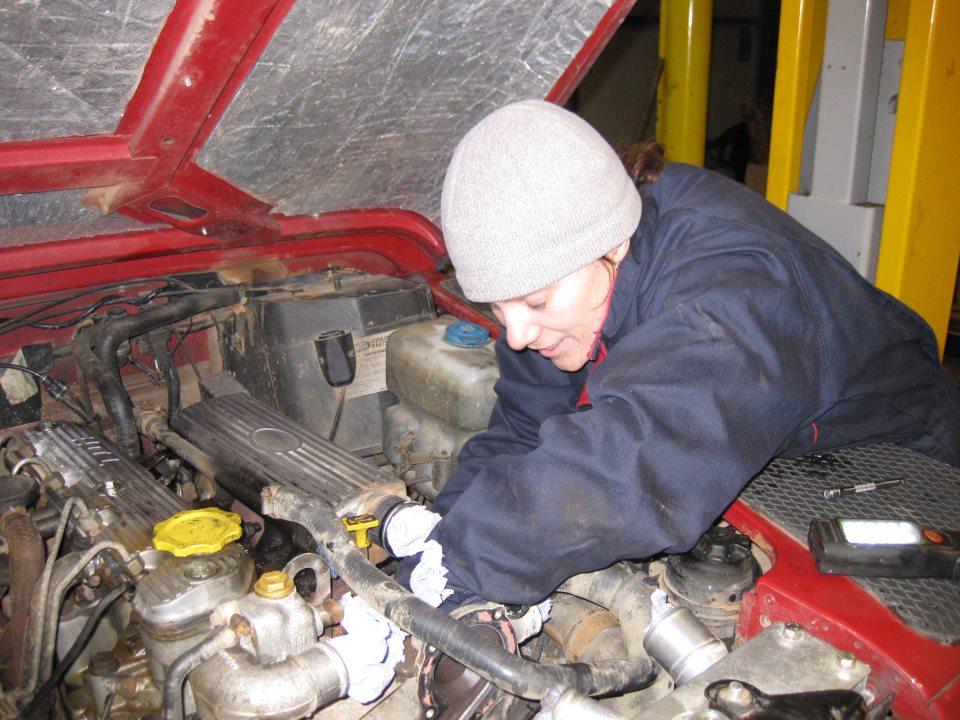
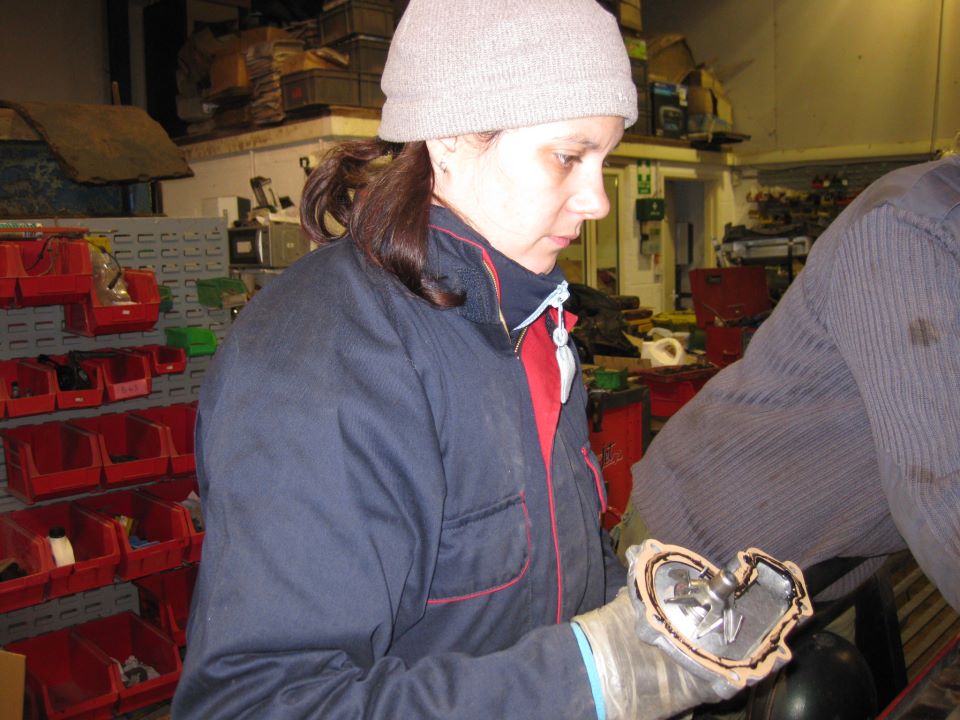
Since returning from our test trip in Morocco we have spent time with Nick Paxton based in Somerset who has taught us basic mechanics, how to service our vehicle and been very patient with the pair of us as we tackled steering, brakes, wheel bearings, half shafts, exhausts, water pumps, alternators, manifolds, gearbox mounts, various gaskets - to name a few things.
|
|